test


test
As a long time PX4 owner it's great to see its reemergence and for very good reasons TMHO.
I've seen some of the available tweaks and after market parts available today but wanted to give you an old school angle of achieving the same (if not more) without breaking the bank.
I just received the new G-SD which is probably the first model that brings something new and meaningful to the PX4 line with the 0.40S&W barrel thickness over the 9mm bore, adding a little more mass to the barrel and further flattens the already flat shooting experience. Thank you Beretta!!
None of the other carry models are important to me because they had the same exact barrels and main parts as the basic original FS and C.
The FS and FS Carry share the same skinny barrel while the C, CC and now the CC2 share the same heavy (0.040S&w) Barrel already.
I'm ignoring the small exterior controls which are different between the models since it's a personal preference whether or not to have them. EG.. I don't like the CC model's stealth decockers and the sharp/extruding mag drop.
These decockers are hard to manipulate and the tall release knob sticks out too much to the point of accidental mag release. Once again, personal preference that is easily and cheaply replaceable.
Filing down the standard stock decockers to a rounder shape works just fine if you're handy (and I assume you are if you are here).
The now discontinued Competition Trigger Groups that came with the older Carry models were nice but too costly and not really needed to achieve our goal: a glassy smooth 7/3Lb DA/SA with short SA reset and optionally no SA take up that will be on par with a good 1911.
There are 4 things to address in this job:
1 - Trigger Bar geometry and friction with the polymer wall
2 - Hammer and Seer engagement surfaces geometry and friction
3 - Springs weight
4 - Hammer type
1 - Trigger Bar geometry and friction with the polymer wall
Beretta ships all PX4s with pretty much the same notched Trigger Bar.
If you prefer a short SA reset (about 0.1") the notch needs to be filled up with metal.
I will save the G-SD original part (it looks a bit different than my other bars) and use this spare bar for now.
Notch is filed down to bare metal
Notch is loaded with brazing flux (use a lot..)
Harris 4531 Safety Silv 45 Silver Brazing Alloy is used as filling material (56 is also OK but slightly softer)
I use this as a torch to get the metal in the notch area to glow dim red
Allow the material to flow to the hot area and form a little ball and let it cool dawn slowly. like this
File/sand the excess material to form a perfectly smooth edge over the notch area
Sand/buff the entire bar gradually down to 400 grit and polish to high luster gloss
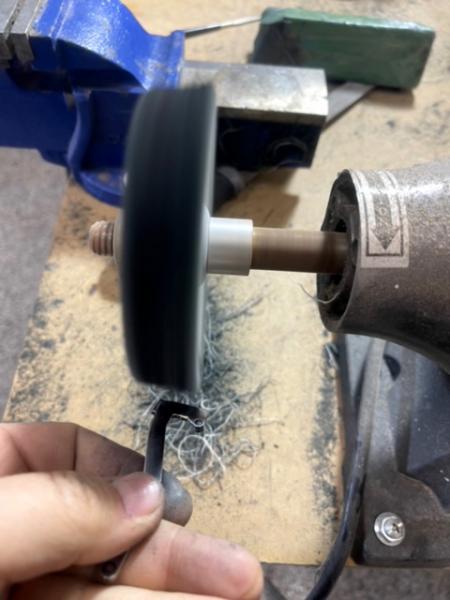
Polished Trigger Bar including all engagement surfaces.
Careful not to change the geometry and surfaces. Only polish!

2 - Hammer and Seer engagement surfaces geometry and friction
Remove Trigger Group and original Trigger Bar
Here's the modified bar next to the original
I heavily lube the entire Trigger Bar and replace (lube is TW25).
I remove the hammer and sear from the group to be (optionally sanded and) polished
Next step is to be taken with extreme caution! If you are not comfortable with delicate gun work let a trusted gunsmith do this step
There are 3 engagement areas on the hammer, DA hook, SA and Half Cock.
OPTIONAL - Hammer SA engagement filing:
For a competition type SA I remove material from the SA surfaces and create a shorter step, about 60% of the original depth.
This can reduce the pull weight and sensitivity a lot so go slow and test often as you remove material.
Removing too much IS DANGEROUS and dims the firearm UNSAFE!
Always push forward on the cocked hammer to make sure it is not slipping unless the trigger is pulled!!!
For a better all around trigger and EDC no filing is needed at all.
Polishing is done with flat Arkansas Stone followed by a buffer to achieve a perfectly mirror smooth and flat SA surfaces on both the hammer and sear (sorry for out of focus iphone shots)
I also polish all the in between surfaces where the sear is "riding" the hammer. like this
Apply lube and reassemble the pistol.

Last edited by preeb; 03-13-2024 at 01:21 PM.
3 - Springs weight
There are a few springs that affect trigger behavior: Hammer spring, Trigger spring, Sear spring and Triger Bar spring.
All of these need a break-in period so expect about 20% drop in spring weight.
I don't replace the Hammer and Trigger springs periodically but the Sear and Trigger Bar springs should be replaced every 20K rounds max.
The G-SD comes with the shorter PX4 D Hammer spring which is good for most ammo types but not light enough for me.
I prefer a 10Lbs spring with this set up and I make sure to use ammo that is 100% reliable for that weight.
The Sear spring can be modified by force-twisting it to a slightly smaller angle (be careful.. a little goes a long way and safety first!!!)
The Trigger spring will loosen up within ~1000 rounds so I'd wait to see if replacement is at all needed. I keep it as is for now.
4 - Hammer type
To remove the take-Up from the SA use the Beretta Match Hammer which in conjunction with all the above (including the optional stuff) the PX4 will turn into a superb competition monster BUT unsafe for EDC or home protection.
On this particular pistol I kept the original.
The average (5) pull weight readings for DA and SA of this new pistol are ~7.1/3.2Lb, but I expect it to settle down at about 6.75/2.8Lb in time.
The DA geometry stays the same.
The lock time stays the same.
The SA geometry has a very short and snappy reset that is just perfect for very fast accurate shooting.
Here's a little video to demonstrate the SA reset
That's it... Hope I helped someone out there
Last edited by preeb; 03-13-2024 at 01:17 PM.
This an excellent writeup w/ great pics to illustrate what you are doing. You are doing most of what I do on a 92. Now I usually use LTT NP3 parts but even then I lightly polish the trigger bar and hammer. Before I had NP3 parts I did like you. The one thing that really surprised me was the first time I watched the sear as I made a DA pull. It was accidental. Well heck that sear moves in a DA pull? What? Didn't take long to realize the hammer has the sear riding on it the whole time it is moving so I found a whole new (to me) couple of places to wet sand and polish. BTW, I have popsicle sticks, double side scotch tape, and I cut strips of sandpaper to tape to the stick. Working on a flat surface like the sides of the trigger bar and hammer, I feel this helps to keep it flat. I like to use the wet/dry sandpaper from auto parts stores. It is now readily available in up to 1000 grit.
Thanks!Originally Posted by CraigS

NP3 is great until it wears off and exposes the bare steel, and it happened pretty fast on the one sample that I use.
I have a fully optioned CC LTT with NP3 and it is missing the coating from all the engagement surfaces after a couple thousand rounds so it's easier for me to just buff the parts to mirror and lube . It runs sleeker as well and never had anything rusting since my first service issued 92 in 1987.
I'd love to do a full DLC PX4 some day. The competition hammers are DLC coated and no signs of any wear yet!
I will have to look more closely to see if I see any NP3 wear. I have never noticed it. I have had some of the parts for 5 yrs or so. I did have one trigger bar that wore a line across the surface where the hammer hooks engage. I polished it to help and then replaced it figuring it was a one off. Time to check the others. I have noticed a couple of times that I can nearly duplicate NP3 w/ just my polishing. One thing I have thought about is the holes in trigger, hammer and sear for the pivot pins. I can't do anything to them for fear of making them larger than the already pretty loose fit so I 'think' NP3 can help there.
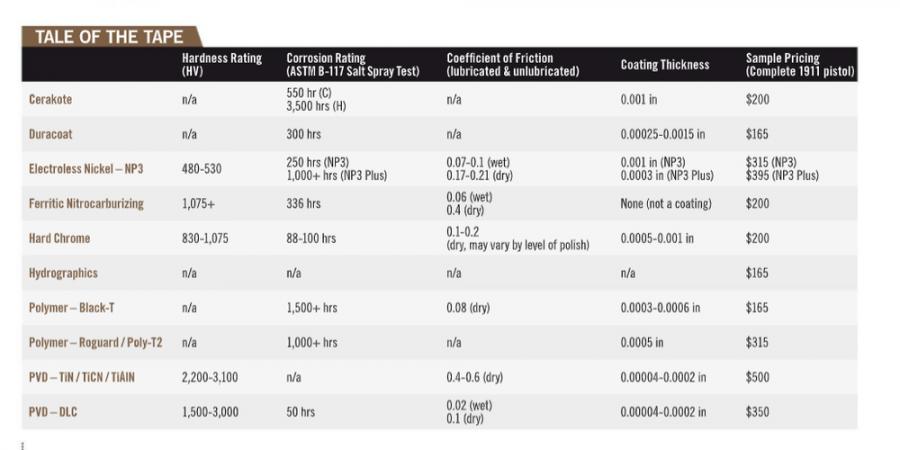
DLC is far superior to NP3 in both hardness and Thinness.
Lubricity is no issue as I lube my MP4. See the following comparison table.
Pivot pins take a drop of oil (not grease).

 Reply With Quote