Page 1 of 5 123 ... LastLast
Results 1 to 10 of 47

Thread: What are your DIY stippling tips/tricks?

  1. #1

    What are your DIY stippling tips/tricks?

    I have used on Talon Grips but thinking of DIY stipple due to cost of pro stippling.

    Any tips or tricks that I should be aware off?
    So far..
    Take my time, practice on anything plastic.

    Please share your pics if you have done your work too.

  2. #2
    Site Supporter
    Join Date
    Feb 2011
    Location
    Midwest
    Clink the link for an illustration between the 2nd gun I even did and the 42nd gun I textured.

    https://pistol-forum.com/showthread....ight=stippling

    In my experience, the best way is the hardest way, one pore at a time with a narrow tipped soldering iron or wood burning kit. I have recently started using a more agressive, linear "treebark" style of texture as well. I view the linear as an advanced technique because the downforce to make it more effective the the "pinprick/orangepeel" texture is such that you could go too deep and damage your frame given the force and/or heat.

    Be advised that the polymer of P-Mags, Glock Mags and the Glock pistol themselves all behave differently when given the heat. While practice on a non pistol item is helpful, there is no substitute for a gentle and patient touch. The first stick is the hardest.

    Surface prep with a dremel (or other mechanized sanding device) is needed to go to the next level visually. Know that a dremel (or other mechanized device) can also take off too much material too qucikly both abrasively and via heat. In a worse case scenerio, you will "dremel" right thru (or nearly so) the grip and ruin the frame.

    I am posting this because Ben at Boresight Solutions and another gentlman whose name I have forgotten, graciously gave me a tip or two ( re both texturing and safety) so I though it only right to pay it forward so to speak.

    As someone who has been essentially a DIY glock stippling guy since about 2006, I have a decent frame of reference on this issue. Ben reset what was "professional" looking and established the new standard re defined edge lines, triggerguard thinning and an essentially seemless appearance despite doing full reductions etc. In Ben's case, function definitely follows form as well. IMHO, Ben's excellent work has given rise to a number of other fine craftsmens making it a win/win for all those wanting a better Glock etc.
    Last edited by vcdgrips; 06-15-2016 at 04:39 PM.

  3. #3
    Quote Originally Posted by vcdgrips View Post
    Clink the link for an illustration between the 2nd gun I even did and the 42nd gun I textured.

    https://pistol-forum.com/showthread....ight=stippling

    In my experience, the best way is the hardest way, one pore at a time with a narrow tipped soldering iron or wood burning kit. I have recently started using a more agressive, linear "treebark" style of texture as well. I view the linear as an advanced technique because the downforce to make it more effective the the "pinprick/orangepeel" texture is such that you could go too deep and damage your frame given the force and/or heat.

    Be advised that the polymer of P-Mags, Glock Mags and the Glock pistol themselves all behave differently when given the heat. While practice on a non pistol item is helpful, there is no substitute for a gentle and patient touch. The first stick is the hardest.

    Surface prep with a dremel (or other mechanized sanding device) is needed to go to the next level visually. Know that a dremel (or other mechanized device) can also take off too much material too qucikly both abrasively and via heat. In a worse case scenerio, you will "dremel" right thru (or nearly so) the grip and ruin the frame.

    I am posting this because Ben at Boresight Solutions and another gentlman whose name I have forgotten, graciously gave me a tip or two ( re both texturing and safety) so I though it only right to pay it forward so to speak.

    As someone who has been essentially a DIY glock stippling guy since about 2006, I have a decent frame of reference on this issue. Ben reset what was "professional" looking and established the new standard re defined edge lines, triggerguard thinning and an essentially seemless appearance despite doing full reductions etc. In Ben's case, function definitely follows form as well. IMHO, Ben's excellent work has given rise to a number of other fine craftsmens making it a win/win for all those wanting a better Glock etc.
    Thank you! I was even thinking of using a block and sanding by hand even tho it will take more time but less risk.

    Sent from my LG-D850 using Tapatalk

  4. #4
    Member Al T.'s Avatar
    Join Date
    May 2011
    Location
    Columbia SC
    you could go too deep and damage your frame
    I did that on the bottom of one (G17). It was my first and I figured that starting from the bottom made more sense (nothing to kitten up if I burned through). It shoots just fine and will be the first on the list if I decide to cut a 17 in order to use G19 magazines.

    Surface prep with a dremel
    Fine wood rasp works well and seems quick enough...
    Last edited by Al T.; 06-15-2016 at 06:49 PM.

  5. #5
    Site Supporter Clobbersaurus's Avatar
    Join Date
    Apr 2013
    Location
    Waaaay out west.
    About a year ago I did a picture tutorial of how I go about stippling on another forum. I will try to repost here when I get some time later tonight.

  6. #6
    Member orionz06's Avatar
    Join Date
    Feb 2011
    Location
    Pittsburgh, PA
    Think for yourself. Question authority.

  7. #7
    Site Supporter Clobbersaurus's Avatar
    Join Date
    Apr 2013
    Location
    Waaaay out west.
    Here's a post I made on another forum about a year ago. I hope it helps.

    Quote Originally Posted by Clobbersauras View Post
    I've always been mystified by those that pay big bucks to have their guns stippled. If you have a reasonably steady hand and can spare $15 for tools, you'll have all you need for a lifetime of stippling. I've given a pictorial below of the method I use to stipple my guns, hope it helps.

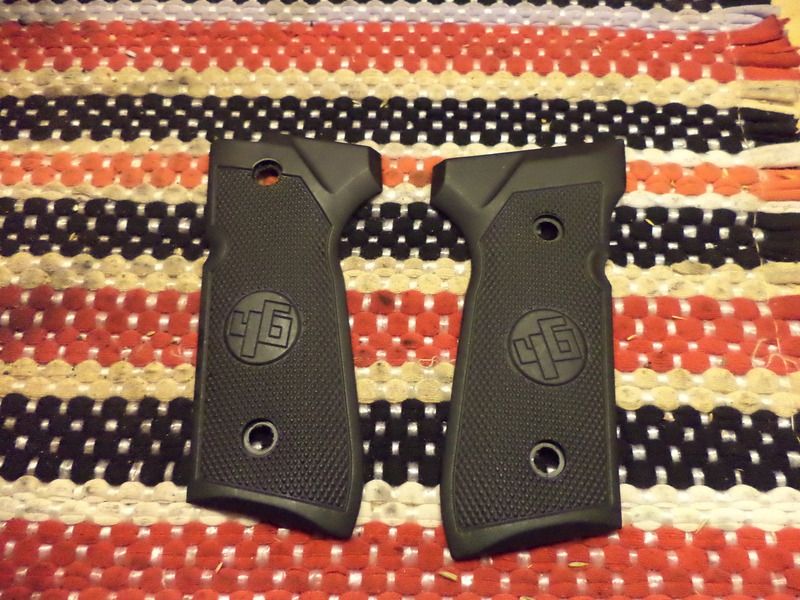
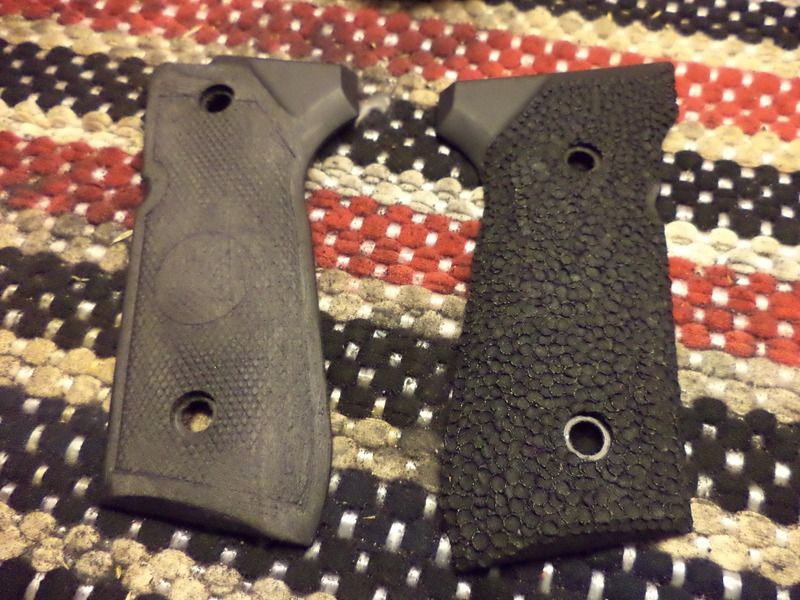
    The Girsan grips in their all their stock grossness.

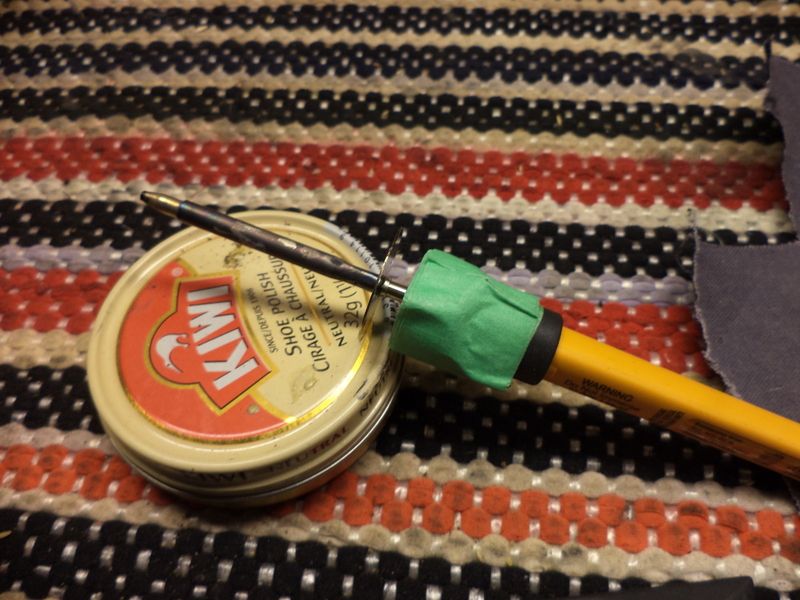
    Here's my trusty "stippler". I picked this sweet baby up from Princess Auto for $10. It's a soldering iron and came with a bunch of little nubs. I wasn't happy with those and after some trial and error, decided that a larger melt makes for a better grip. I filed down the pinpoint tip to the dimension you see here.

    Everything you need to stipple your gat is pictured below; sandpaper and soldering iron (the shoe polish isn't needed, I just couldn't find the holder for the soldering iron and didn't want to burn my workbench) - that's it! I use a very coarse sandpaper to remove the high points and lines from my grips. If you don't, you'll likely still see a faint outline of them after you stipple. It's purely an aesthetics thing, but it only ads about three minutes to the whole process.
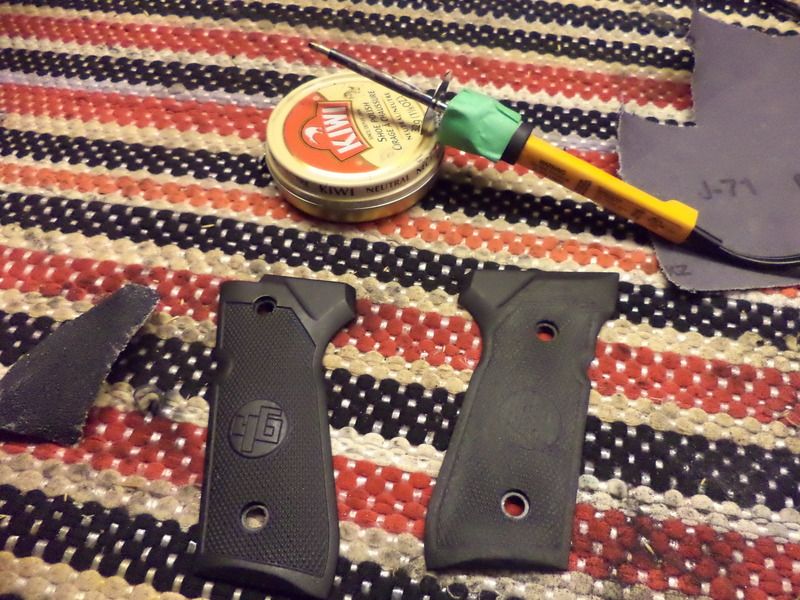

    I like to start slow and work my way around the edges of the grips (or frame). Make sure you have your soldering iron good and hot before you start stipplin'. You only need to press it lightly to the plastic for a fraction of a second. Go slow and light at first and you'll get the hang of it.
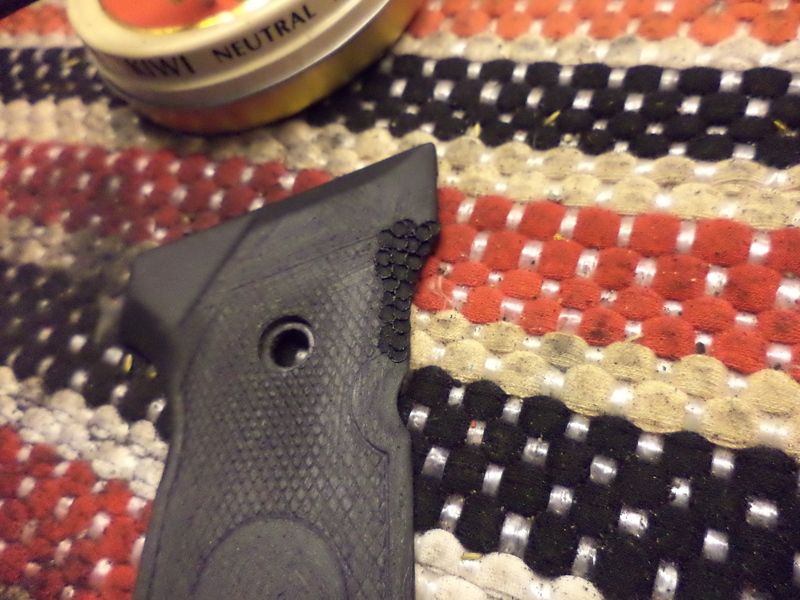

    After I make my initial row of stipples around the edge of my grip I like to random stipple the middle and around any faint outlines I didn't take off with the sandpaper. If I don't do that I have a tendency to stipple around the lines and designs and it doesn't look as random as it should.
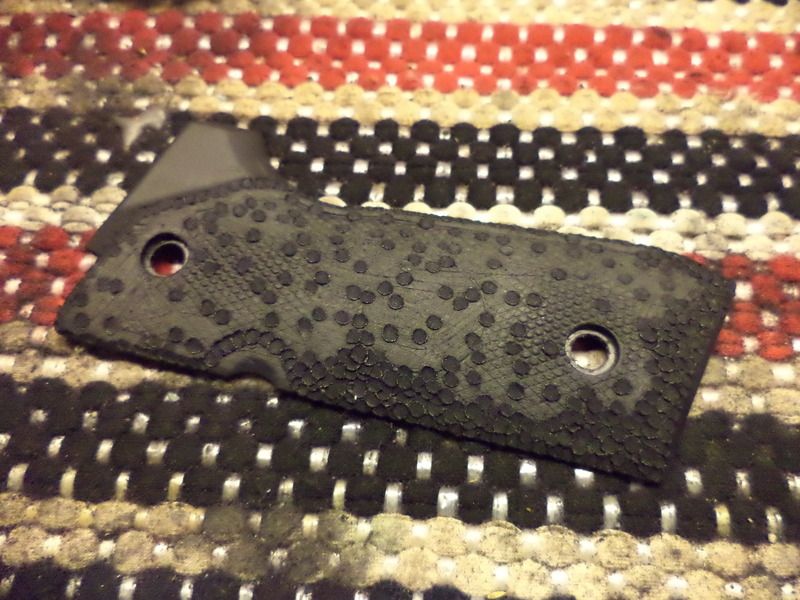

    Then I just fill in the non stippled parts. You can get as OCD with this as you like. I prefer a more random look. I'm sure the fumes of melting plastic are probably pretty toxic, so if you can, work in an open space with a fan pointed at your work to blow the fumes away from you. Mask up if it's important to ya.

    One down and one to go.

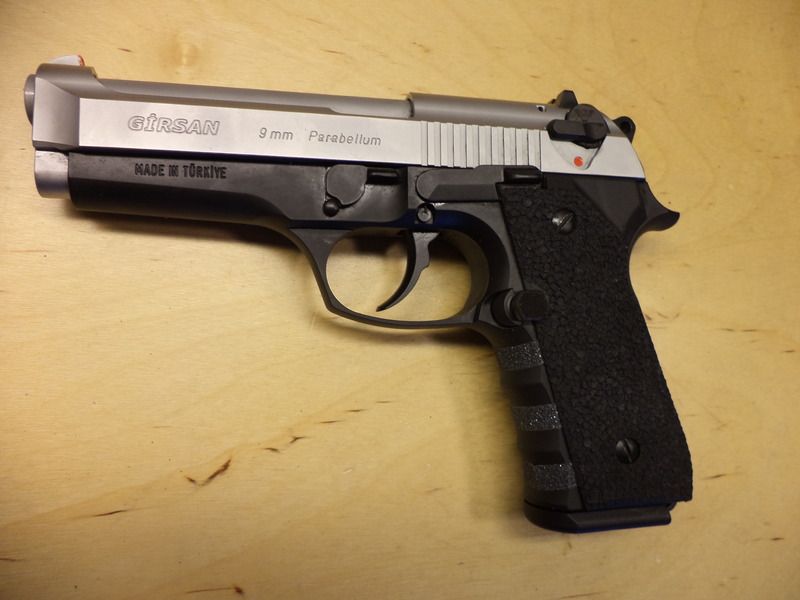
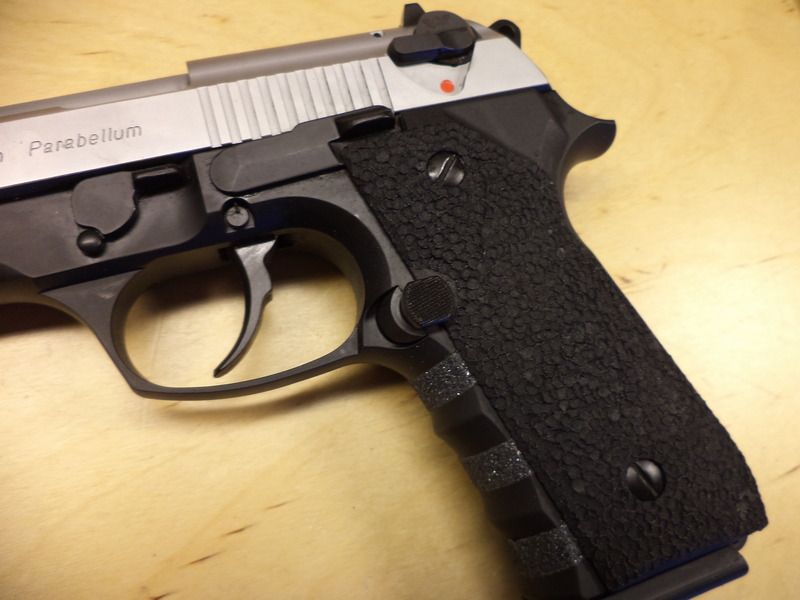
    Finished product! It only took about 30 minutes to do both grips. The gun sticks like glue now. The Wilson parts are the HEAT by the way. They dropped in just fine, and work as advertised.
  8. #8
    Site Supporter taadski's Avatar
    Join Date
    Mar 2012
    Location
    Colorado
    This.

    I've spent A LOT of time doing my own fine point stippling work. And this does a very similar job using the same iron with about 1/10 of the invested time. Really. Best $8 I've ever spent.

  9. #9
    Site Supporter
    Join Date
    Feb 2011
    Location
    Midwest
    Fully acknowledging that reasonable minds can differ, I am not a fan of the multi tip head. If you press too lightly, it still does not have the 1 stick coverage the the single pore meethod has wsuch that you still have to do extensive touch up with a single point element despite dropping the multi tip multiple times in the same general area. If you press firmly, the edge of the head makes contact with the frame such that you can see the circumference of the head in the polymer making it appear less seamless imho.

    I have come to believe that a more tree bark like texture provide better traction but can be much harder on the hands and cover garments. Such a texture is also less pleasing to many eyes.
    Last edited by vcdgrips; 06-15-2016 at 11:36 PM.

  10. #10
    I really wish I was brave enough to do this to my 19. Mostly the trigger guard undercut. I use the medium blackstrap so I'm not sure how I could stipple all of it and make it look good.


    Sent from my iPhone using Tapatalk
    "Shooting is 90% mental. The rest is in your head." -Nils

User Tag List

Posting Permissions

  • You may not post new threads
  • You may not post replies
  • You may not post attachments
  • You may not edit your posts
  •